Complete Restoration History
After 20 years it’s always interesting to go back over the bike history and have a look at what I have done to her. From being my daily rider for 10 years to finally getting a well deserved break, the old girl is still in pretty good condition and I’ve scheduled more work on her to get her back to as mint as I can.
May 2007
After going on an 1100klm ride with my club ( our annual 1/2way ride (Brisbane to Nambucca Heads then out to Taylors Arms) followed by a 400klm day trip through the mountains a week later, a “high tide” mark appeared and the fork oil started to piss out of both fork tubes, it looks like the seals are shot and there is a long score mark on one of the fork tubes.
On the weekend of the 20th I stripped the forks (about 30 minutes effort in total) and discovered that the score mark on the tube has also resulted in a score inside the lower fork leg.
The net result is that the tubes will need to be hard chromed to remove the scoring and I might need to bush the lower fork leg as the score is quite long inside the lower leg.
Later model bikes (GPz etc) have a top and bottom bush to alloy the tube to slide on inside the lower leg. Early model tubes slide “alloy to hardchrome” on a thin film of oil, which is OK if no grit gets in.
28th May – Update
The workshop that I use for doing hardchrome was not too busy, so the tubes were done pretty quickly and there are no issues with them. Also, the lower fork leg is fine and does not need a bush. A light rub with some emery paper is all that was required to take the lip off the score inside the lower leg. I also collected the lower triple clamp back from a small machine shop in a guys garage in the next street. The gentleman runs “Vintage and Classic Reproductions” which specialize in making dies and tooling for casting moulds used to make vintage car parts. He was happy to use his EDM machine to burn out a broken tap that snapped while I was cleaning out the brake union mounting holes. He had to burn the hole to allow it to be tapped to 8mm but that is not an issue. I will be assembling the forks once I find what I did with the new seals.
This week Wayne from Specialized Blasting Services called and my boxes of parts for the 3 other bikes are ready so its going to be a busy weekend!
June 2007
The front end rebuild went really well, the work done included getting the lower fork legs Water/Vapor blasted, clear coating and the fork tubes hard chromed, and the EDM repair to the lower triple clamp worked a treat. New oil was put in (170cc each leg) and the result is a really nice ride. I went on another club run and it rained for 2 hours and all through the night, the result was some difficulty in starting the bike which proved to be ignition coil wiring and possibly the kill switch. Once the bike was home I decided to strip it again and redo some parts of the coil wiring and am at present checking all the electrical connectors as a number of things like blinkers and parkers failed to work. Gotta love 31 year old bikes!
July 2007
The electrical system is still failing intermittently (I suspect an earthing problem) so I decided to strip all the wiring out of the bike and lay it out on the bench to figure out what is going wrong, in the process I will be trying to replace a broken connector and then try and recover the harness with new black cable sleaving.
July Update
Well the bike is up and running after I replaced the coils and rebuilt the wiring harness. There was a faulty earth back to the battery so the bike was trying to earth through the headlight shell which was not working to well as an electrical conductor after the front end was rebuilt by me last month (new rubbers – no conductivity).
I also removed the z1000 carbs and rebuilt the original ones and now the bike just needs the sync done with a set of vacuum gauges. Its running well when off idle (idle is crap at present till the tune is done).
Now the bad news, the gear change has been loose for a while and the spline has now sheared so the bike was stuck in 3rd but at least I could cruise home! Should not be a major problem to remove it and put a different gear changer on.
August 2007
A lot has happened in the last 2 months! The “Z” has been showing a growing range of failures so some major work has been done each week to rectify the issues and get on top of the problems.
Wiring
The wiring has been completely overhauled and this weekend (10th August) I replaced the fuse box with three individual inline automotive colour coded fuses. I have been having odd problems with the headlight failing for no obvious reason, since I run a halogen bulb I replaced the fuse with a 15Amp instead of the standard 10Amp.
Carburetors
The z1000 carburettors (from my 78z1000A2) that I installed when I had issues with the original set started to cause me no end of grief, so in July I purchased four (4) rebuild kits from z1enterprises and finally decided to rebuild the original set.
I recently had the bodies Vapor blasted and I clear coated them one weekend not to long ago so they have been sitting around waiting for me to pull my finger out. They are now installed and after doing a manual sync I borrowed a set of vacuum gauges and fine tuned the vacuum between all four carbs then set the mixture to 1 ½ turns as per the manual. It’s idling well when warm and starts first go but cold starts need the choke in the current cold weather.
September 2007
A lot has happened in September, I blew a seal in the master cylinder while pushing the zed through the twisties of Mt Mee, then Mt Glorious and finally home via Mt Nebo. The brake fluid started to piss out all over my right hand as I went from full acceleration to full front wheel braking in every corner!
As a result I got the bike home safe and sound minus most of its fluid and had to pull the master cylinder apart to verify the 31 year old part had met its use by date. An online order to z1enterprises should see a new one arrive next week. In the meantime it has given me an excuse to get the unit cleaned and clear coated as I just collected two boxes of parts from Specialized Blasting Services, so a few more bits isn’t going to kill me.
Most of my efforts this month have been maintenance related with an oil change and some general checks and adjustments. Other work on the other bikes has been more intense.
October 2007
The front brake parts arrived from the US so once the master cylinder came back from being water blasted, I clear coated it with a pile of other parts and then re-installed it on the bike. A bit of effort to bleed it but all was well within a few days! Shame the cylinder head is now leaking oil everywhere and its blow a small puff of smoke under acceleration! I can’t win with the bike. Its due for a service on the shims so I will get a new cam cover gasket and recheck the shims shortly, I’m doing that at 3000-5000 klms now.
I checked into getting the frame straightened at Dave Kellet Motorcycle Engineering and will be planning it once the GPz900R is on the road. Hopefully the head lasts that long. I might look at doing a quick strip and rebuild but I really want to strip the motor right down and get it cleaned so I’ll just have to play it by ear at this stage.
The carbs are partially assembled, there are few traps for the unwary, just put all the fittings together before screwing the bodies to the backing plate. It might also pay to buy new “T” fittings that feed the fuel into each pair of carb bodies. The kits have a set of extra main jets, mine had 125 jets which seamed quite large so I reduced them back to 118 and might even go back to 115 size as an experiment in the near future.
Just one comment to make about assembling the carbs, make sure you keep all the parts in the same container and double check the carb kits, they are different for the z900-A4.
March 2008
I stripped the bike and sent the frame in to get straightened and get some of the extra brackets removed. Dave Kellet Motorcycle Engineering did a great job to twist the rear of the frame back into shape and put the original brackets back while removing the drag bar mounts. All up it was around 3 weeks work. Dave told me he did his Apprenticeship on Zeds so he was happy to work on one again.

The final strip down is started, the rear shot shows the damage the bike suffered in an accident, the frame has since been fully repaired.

This is the frame jig that is used to bend bikes back into shape. The frame has attachment points to allow hydraulic jacks to be mounted to push the frame as required.
The bike is secured by the head stem and all measurements are taken from that point. Even brand new bikes can be out by 10mm or more straight off the assembly line due to poor manufacturing practices.
With the frame fixed I decided to put new bearings into the swingarm. The bronze bearings push out pretty easy with a 6 ton press. The swing arm contains two bushes pushed in from each end, before they go in there is a hollow spacer shaft that sits between them and rotating inside the bushes are two tubes that sit on the swing arm shaft.

The swing arm was chrome plated when I bought the bike, shortly it will be powder coated black! Once it comes back new bushes from z1enterprises will be installed and the shaft will get the bolt head chromed and a new chrome nut fitted.
Note to self: Need to insert the grease nipple and fill the swing arm with new grease.
When you strip it all down there is not much to a bike. The engine is sitting on a rolling tray ready to be stripped and the rest of the parts are stacked in the two 55L containers and the wheels, forks and frame sitting behind it.
June 2008

The ute is loaded with everything that needs powder coating including a range of z1000 EFI parts for the “other” project bike. Should take 3 days maximum and the parts will be done in satin black over at Northside Powder Coaters. When taking parts in to get done make sure all the grease, oil and grime is removed, they don’t like it clogging the sandblaster. Also, make yourself an inventory sheet of parts so you can check it off when you pick them up. In all there was 34 parts to keep track of.

To protect key threads and bearing surfaces from paint the powder coater knows to cover the shaft of the bottom triple clamp after it has been blasted clean.
The photo above shows the rear shock mounting points, the left has been cleaned up and a M12x 1.25 button Die used to clean the thread, the right is still wrapped in alfoil to stop paint getting into the fine threads. The other 4 holes have had an M6 Tap run through them.
Pre-Assemble
With the parts back and ready for re-assembly, I have run a tap into every thread and suitable button dies over the male threads.
The swingarm bearing surfaces have a trace of paint, so this will be cleaned with paint stripper (carefully using cotton buds). The new bronze bushes have not arrived from Z1Enterprises yet but should be here by next week. I have a tool to press them in, its was made using the dimensions of an old bush.
The z1-z900 series swing arm bush have a lip on them so you cannot get the depth wrong. I should be able to put the shocks on, triple clamp, horn, brake union and brake lines and a host of body parts.

On time and on budget, the box of finished part including frame, centre stand and swing arm was $400 all up and ready in 3 days. The black parts are tricky to photograph but you get the idea.

A box of parts arrived this week, among them are the replacement bronze bushes. Fitting the new bushes is easy with the right tool. Several years ago I had a friend spin up this handy tool for one of my CB750’s. The tool also fits the z900 bushes so it is a safe and easy way to either press or tap in the new bush. The red stuff is rubber brake grease which just happened to be on hand.
July 2008 Update
I managed to get a weekend free to assemble as much as possible, so the rolling frame stage is starting to materialise. Most of the restored parts were assembled to frame and some parts were ordered from z1enterprises, surprisingly I located the front brake union pipes at Z-Power down south so I ordered a set. The front wheel was badly worn from the frame damage so a new Metzler Lasertech was fitted to the front wheel. The rear wheel was a Mezamatronic, which I need to replace also, having stolen the rear from the z1a.
Work done:
• New front tyre – Metzler Lasertech (ME33)
• Assembled triple clamps (temporary assembly).
• Installed forks and front guard.
• Fitted front wheel.
• Installed front calipers.
• Installed swing arm and rear shocks.
• Installed battery holder and brackets.
• Ordered coils, battery rubber kit, mirrors and a new set of foot pegs.
• Installed handle bars, clutch lever and master cylinder.
• Mounted rear fender,light and rear grab rail.
August 2008
• Installed top triple clamp instrument holder.
• Fitted renovated Speedometer and Tachometer.
• Fitted new ignition coils.
• Fitted new mounting rubbers to battery carrier and installed battery carrier.
• Fitted new foot pegs with new cupped washers and rubbers.
• Mounted rear blinker assembly and routed wiring.
• Fitted side covers, tank and duck tail (temporary).
I have taken a box of parts over to Pine Rivers electroplating to redo the chrome on most of the engine bolts, the brake lever and a few brackets and other fasteners. They should be ready at the end of August.
I finally located a source for the PVC tubing that covers the wiring loom, so when it arrives this week I can strip the wiring harness, replace all the bullet connectors and then recover the loom so it looks new. once the wiring is in the entire rear of the bike will be done and once the chrome headlight ears come back the headlight assembly can be installed.
I went on a buying splurge and purchased a 4 into 4 exhaust from Japan. it arrived today but I was not home to sign for it so it will be here tomorrow.
The only major items to achieve are the replacement paint job and the engine disassembly, clean and re-assembly. Some work on the cylinder head may be required (one value clearance is completely wrong.
March 2009
The bike has been siting for a few months as I work on other bikes (too many projects!). Every “now and then” I have added a part as it has arrived with other parts and the bike is fully assembled bar the motor. I have positioned the motor ready to dismantle and begun to disassemble the engine ready for cleaning (water blasting).
I should get a weeks turn around on cleaning according to Wayne from Specialized Blasting Services. Pictures of engine disassemble and before and after shots to follow.
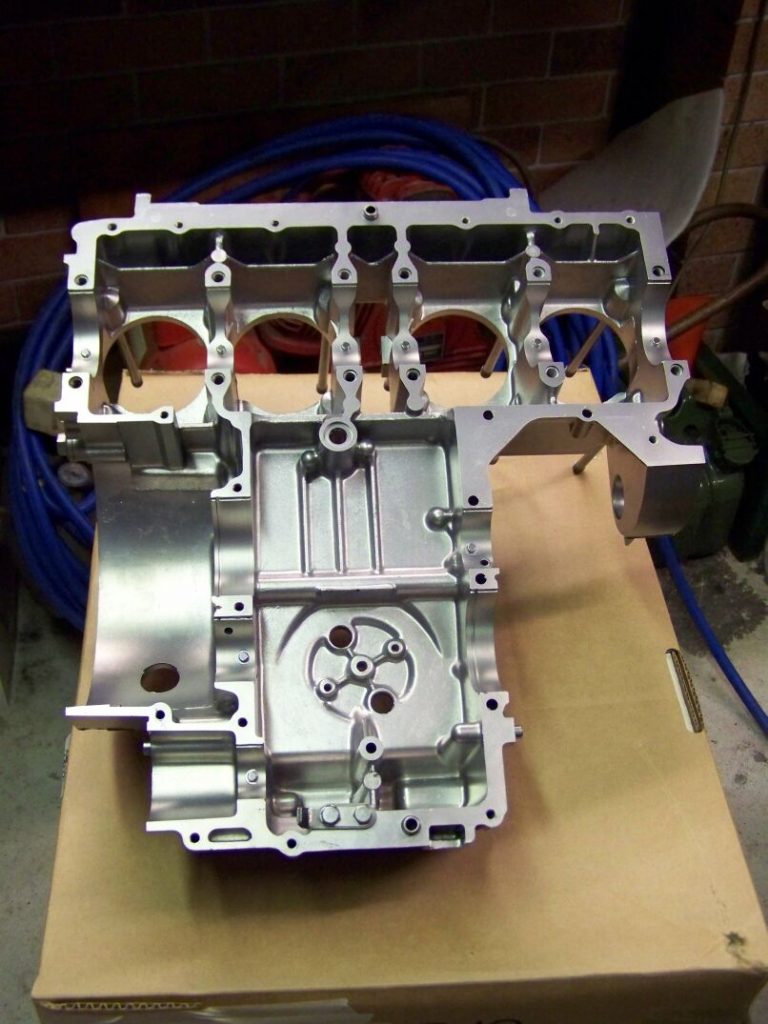
April 2009
The engine has now been stripped back to bare cases and they have been dropped into Specialized Blasting Services for water blasting and burnishing. Should take a week or two to turn around.
The gasket set has arrived, everything can be re-assembled except the cylinder head which has some worn valves (shim size now down to the 210 range) and one valve shimmed at 3.00mm which is just plain wrong.
During the strip process I took about 100 photos of every aspect of the process and will take more photos of the re-assembly.
Two defects have been found, one is in the top engine case, a small hole above a gallery that is allowing oil to escape out in to the sprocket cover area. This will need to be TIG welded closed. The other defect is the cam chain guides are worn.
May 2009
I documented the strip down of the engine and now have all the parts back sorted and ready to start assembly. I plan to make a jig to hold the engine in while assemble it. More to follow.
November 2010
After more than a year I have finished the major assembly work:
- Engine is fully assembled and now installed in the frame.
- 4 into 4 Exhaust is fitted with no issues.
- Damaged top clutch/transmission cover fastener hole, filled ready to drill and tap.
Remaining Tasks:
- Re-paint tank.
Restoration Plan
- Strip the bike back to the frame and get the frame straightened the extra bits cut off from it’s drag racing days DONE
- Powder coat it satin black DONE
- Powder coat the swing arm and fit new bushes DONE
- Buy a set of 4 into 4’s! DONE
- Find a set of left and right brake hose brackets that mount to the front guard (fender) and re-fit. DONE
- Replace the green calipers with black ones and re-coat all black parts as needed. DONE
- Recover Seat. DONE
- Fix the dent in the tank and re-paint – TODO
- Repair the side covers and repaint – TODO
- Fill in the holes holding the racing number plate on the sides of the duck tail and re-paint – TODO
- Change the handle bars to higher ones. Maybe Later
- Strip motor for cleaning (water blasting) DONE
- Rebuild the motor to stop the oil leaks and in the process water blast the cases clean first. DONE
2020
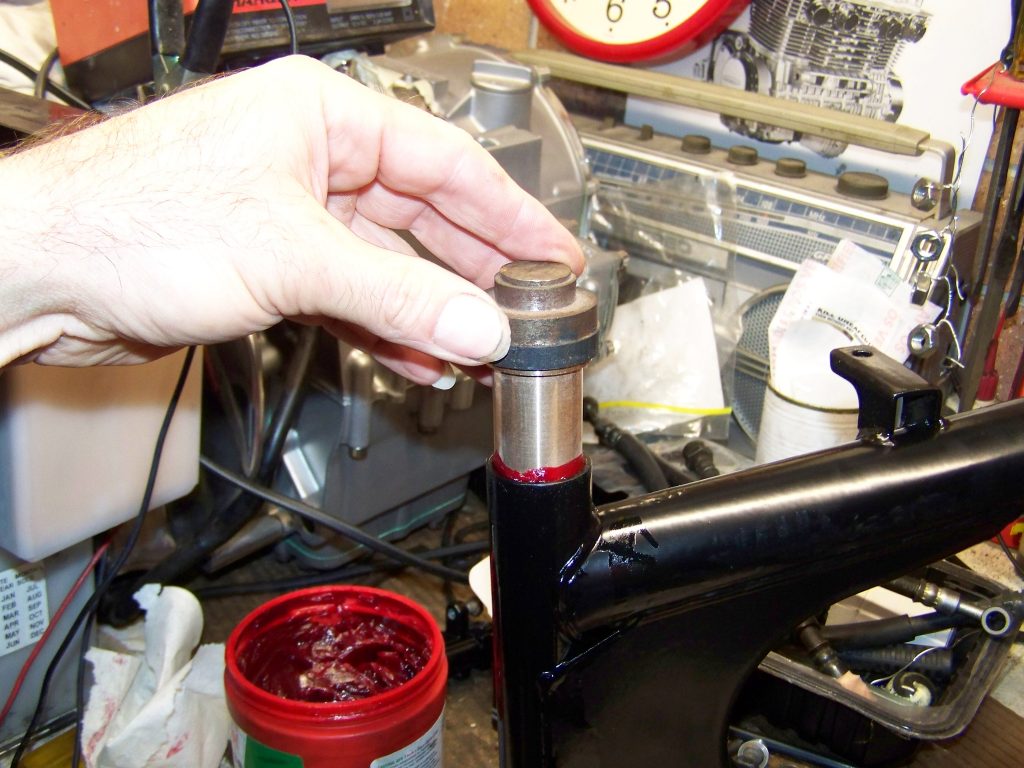
November 2020
The forks have been removed, new seals fitted to the renovated fork lowers I found on eBay and put back on the bike. I have the calipers on the bench for a strip and clean and the brake union piece needs a clean and repaint.
Once the brake parts are cleaned up, I will fit them and then put some new fasteners on it before starting on the sprocket cover. I will post updates in an article (search by the tag z900 on the home page) and then put the battery in and see if I need to pull the engine out and work on it.
-oOo-